
"I lay in tears in bed all night
alone without you by my side"
alone without you by my side"
welcome welcome to the first edition of the new DIY posts! ❤
haha I kinda sounded like Effie Trinket from The Hunger Gmes x) sorry! well, as I said up there this is the first DIY "tutorial" I'm making n____n'
this time I'm gonna show how to do a bookmark! ◕‿◕
as you know I love books ❤ and I always have like three or more bookmarks, so I thought "what if I make one?" I reached how to make it and I found the famous "Monster Bookmarks", I liked them, but I wanted to make something different and as I was loving The Fault in Our Stars I said "why not?"
I made it before the movie came out (and I'm sorry I didn't post it before!) and I really liked the result; remeber, you can do it however you want (the directions are the same about doing the bookmark), so, here we go!
NOTE: this is not a video tutorial, I took pictures of the steps I followed, I hate to make videos, sorry!!
✮⋆The Fault in Ous Stars inspired Bookmark⋆✮

●Blue and White Paper
●Pencil
●Black Pen (in this cae I used a gel pen)
●Scissors
●Glue (I like to use glue stick)
●Ruler
●Black Marker


↪Directions:
1 - on the blue paper we are going to make three squares (I made it 7x7 cm; aproximately 3x3 inches but you can make it the size you want) forming and "L" [img.1]
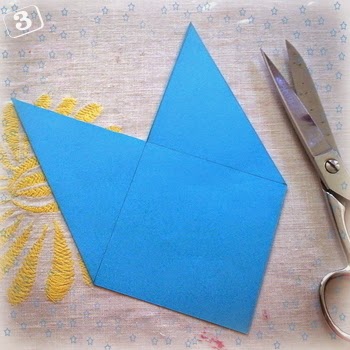
2 - (a little confusing, so check the image up there) now draw a line going corner to corner in two of the three squares so you are going to have the middle square with two triangles [img.2] now, cut it [img.3]
3 - you are going to have something that looks like a fow head; fold the triangles by the line you previously draw [img.4] so you will have the square with the triangles on
4 - apply glue to the triangles to glue them together (NOT to the square) so you will end up with something looking like an envelope [img.5]


5 - on the white paper draw the tfios characteristic clouds and write inside them the words "OKAY?" and "OKAY." make sure they look alike and have a good size [img.6]
6 - fill with the gel pen or the black marker the first cloud but remeber to let the letters white; now use it to mark only the silhouette of the second cloud and the words on it [img.7]
7 - then cut the clouds and glue them to the triangle of the blue square (only to the triangle!)
we finished! and you're gonna end with something like this:


just make sure it's completely dry when you put it on your book otherwise it will get dirty u____u
I don't like writing directions u____u I suck at it, but I promise I'll do it better next time :P
well that was all for now, thanks for your visit! and I hope you liked my 1st edition of DIY tutorial! ◕‿◕
Laters, babies❤
Kodaline - All I Want♫